
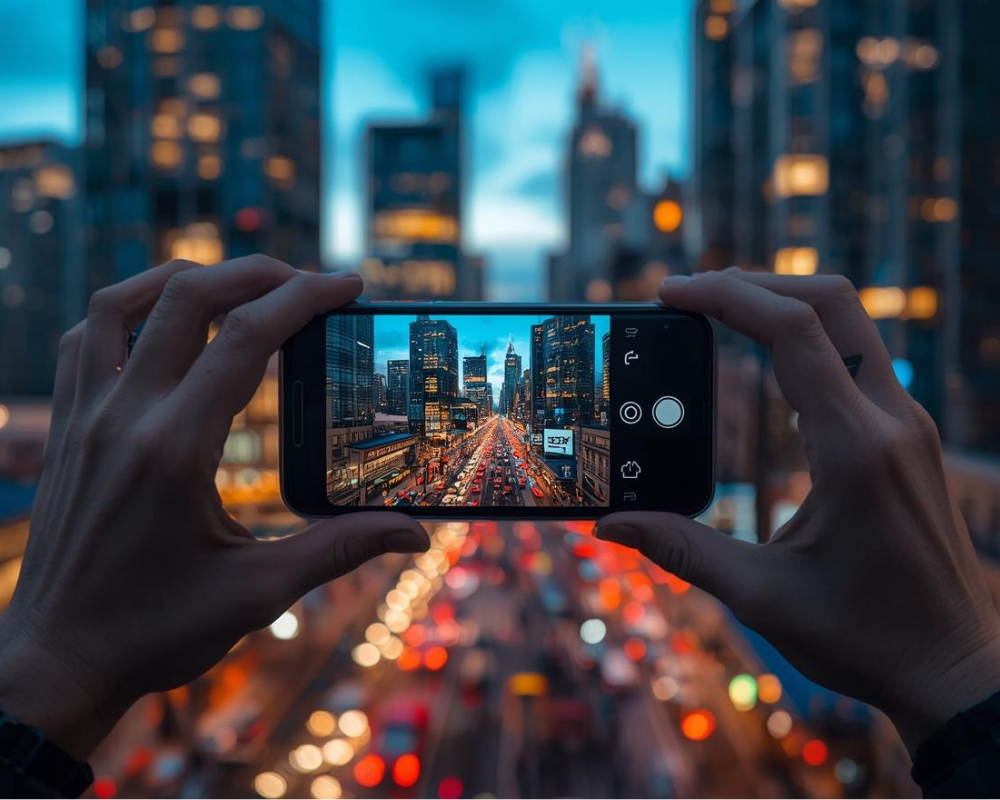
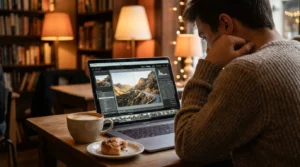
This guide skips the generic photography advice that fills every beginner article and focuses on what actually works — from gear and settings to composition, editing, and the habits that consistently separate good travel photos from forgettable ones. Smartphone or mirrorless camera, complete beginner or someone looking to level up — these travel photography tips cover everything you need. For trip planning resources that complement your photography, visit our Travel Tips for Students homepage.
Why Travel Photography Actually Matters
Travel photography done well captures how a place felt — not just what it looked like. The light at a specific hour that never quite repeats. A stranger’s expression that existed for half a second. The texture of a market stall. The scale of a landscape that photos almost never fully convey but you keep trying anyway. These are moments that genuinely won’t happen again and photos are the only thing that comes close to preserving them.
There’s a skill development angle too that most people don’t think about. Observing carefully enough to take good photos trains you to notice things other travelers walk straight past. It builds genuine understanding of light, composition, and timing — skills that transfer directly into content creation, blogging, and social media if you want to go that direction. For travel experiences that give you genuinely memorable material worth photographing, Slowing down deliberately — spending more time in fewer places — consistently produces better photography than rushing through a packed itinerary
Equipment — What You Actually Need vs What You Think You Need
The biggest mistake beginning travel photographers make consistently — buying more gear than they need and then carrying all of it, which makes them miserable and less likely to actually shoot. Here’s the honest version:
Best Travel Photography Gear Comparison
| Category | Pro Option | Lightweight Option | Budget Option |
|---|---|---|---|
| Camera | Sony A7 IV | Fujifilm X-T5 | Canon EOS R50 |
| Lens | 24-70mm f/2.8 | 35mm f/1.8 | 18-55mm kit lens |
| Tripod | Peak Design Travel Tripod | Manfrotto Befree | Mini tripod |
| Storage | SanDisk Extreme Pro | Lexar V60 SD | Kingston SD Card |
For most student budgets, a mid-range mirrorless like the Canon EOS R50 or Sony ZV-E10 combined with a kit lens covers 90% of travel photography situations. Buying used through MPB or KEH Camera cuts the cost by 30–40% on near-perfect condition gear
The reality about gear that experienced photographers consistently confirm — understanding light and composition matters more than equipment at every level — a photographer who understands light and composition will produce better images with a basic camera than a beginner with professional equipment. Every single time without exception. Gear helps, but skill matters more. Start with what you have, learn to use it properly, and upgrade only when you’ve genuinely outgrown it.
Why light gear matters more than you’d think — when you’re walking through a city for eight hours or hiking to a viewpoint, heavy gear stops being exciting and starts being a physical burden that makes you want to stop shooting. The camera you actually carry everywhere beats the camera you left at the hotel. For students packing for extended trips.
Camera Settings — A Practical Setup Guide
Knowing your settings instinctively means you react quickly when a good moment appears rather than missing it while adjusting dials.
Aperture
- Portraits — f/1.8 to f/4: background blur that separates your subject cleanly
- Landscapes — f/8 to f/11: everything from foreground to horizon in sharp focus
- Street photography — f/5.6 to f/8: flexibility for moving subjects
Shutter Speed
- 1/200 or faster for moving subjects — people walking, vehicles, anything that moves
- 1/30 or slower for intentional motion blur — waterfalls, traffic light trails
- Match shutter speed to focal length to avoid camera shake
ISO
- 100-400 in bright daylight — cleanest quality
- 800-1600 in overcast or indoor conditions
- Above 3200 only when the shot is worth the noise
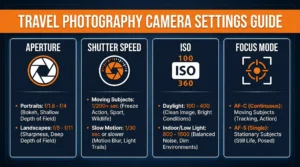
Focus Mode
- AF-C for moving subjects
- AF-S for stationary subjects and landscapes
White Balance
- Auto works well in most situations
- Cloudy setting adds warmth that enhances skin tones and sunsets
- Shoot RAW and adjust white balance in editing without quality loss
The bracket habit — three to five shots of the same scene with slightly different settings costs nothing on digital and you’ll almost always find one that works noticeably better than the others.
Understanding Light — The Single Most Important Skill
Every other photography tip matters less than understanding light. It makes or breaks travel photos — and the best light is completely predictable once you know when to look for it.
Best Times to Shoot
| Time | Quality of Light | Best For |
|---|---|---|
| Golden Hour (sunrise) | Soft, warm, cinematic | Landscapes, portraits, architecture |
| Golden Hour (sunset) | High contrast, glowing shadows | Everything — most versatile light |
| Blue Hour | Cool, dramatic, atmospheric | Cityscapes, reflections, moody shots |
| Overcast day | Soft, even, no harsh shadows | Portraits, markets, street photography |
| Midday sun | Hard, high contrast | Architecture, abstract, patterns |
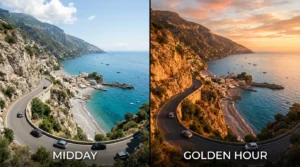
Here’s something beginners don’t know — experienced photographers actually prefer overcast days for portraits and street photography. Soft diffused light means no harsh shadows under eyes, no squinting subjects, perfect even skin tones. Cloudy days are genuinely a gift, not a disappointment. The photographers waiting for sun are often missing the best conditions.
Golden hour arrives roughly one hour after sunrise and one hour before sunset. Apps like PhotoPills or Golden Hour Calculator tell you exactly when it happens anywhere in the world — worth downloading before any serious photography trip. For scenic European shooting locations with exceptional golden hour potential, our Europe Winter Travel Itinerary highlights the most photogenic spots and best seasonal timing.
Composition Techniques That Actually Make a Difference
Composition is the arrangement of elements within your frame. Perfect light and a great subject still produce a mediocre photo with weak composition. These are the techniques experienced photographers use without thinking about them anymore.
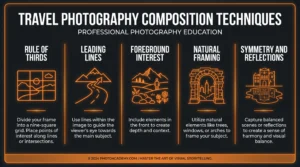
Rule of Thirds Divide your frame into a 3×3 grid and place your main subject or the horizon along the grid lines rather than dead center. This creates natural visual balance that feels right without the viewer knowing why. Every camera and phone has a grid overlay you can enable — turn it on and leave it on.
Leading Lines Roads, pathways, rivers, fences, staircases — anything that leads the eye from the edge of the frame toward your subject. Leading lines create depth and guide the viewer through the image. One of the most powerful composition tools in travel photography and one of the easiest to find once you start looking for it.
Foreground Interest Something in the foreground — flowers, rocks, a doorstep, a reflection pool — creates depth and pulls the viewer into the scene rather than leaving them as an outside observer. Landscape photos especially benefit from strong foreground elements.
Natural Framing Use existing elements to frame your subject — windows, doorways, arches, tree branches, tunnels. The frame within a frame draws the eye directly to your subject and adds environmental context.
Symmetry and Reflections Puddles and wet surfaces after rain create reflection opportunities that most photographers walk straight past. A single figure in a geometric environment, a different colored tile in a regular pattern — symmetry becomes immediately compelling when something breaks it.
The one-second test — if a viewer can’t understand what your photo is about within one second of looking at it, the composition needs work. Clarity of subject and story is always the goal.
For real examples of professional-level composition, the National Geographic Photography gallery is one of the best free references available.
Smartphone Travel Photography Tips
Modern smartphones can produce professional-quality travel photography in the right hands. Most people use maybe 20% of what their phone camera can actually do.
For students not ready to invest in a dedicated camera yet, a recent iPhone or Samsung flagship shoots genuinely impressive travel photos — and the best smartphone photography skill is free to develop right now, wherever you are.
Settings worth enabling:
- RAW or ProRAW mode — dramatically better editing control
- Optical zoom only — digital zoom just crops and degrades quality
- Pro or Manual mode — control over shutter speed, ISO, and white balance
- Grid overlay for composition
- Wipe your lens before shooting — sounds obvious, makes a visible difference
What smartphones genuinely excel at: Street photography where a small discreet camera is less intrusive. Food photography. Night city scenes with modern computational photography. Candid portraits. Reflections and close-up detail shots.
A small flexible tripod that fits in any bag costs almost nothing and completely transforms night and low-light photography on a phone. Handheld versus tripod at night is a completely different result. For apps that assist with smartphone photography, editing, and organizing shots, our Best Travel Apps for Students 2026 covers everything worth downloading.
Editing Workflow — Completing the Photo’s Story
Editing isn’t cheating — it’s completing what the camera started. Every professional photographer edits. RAW files are intentionally flat because they’re designed to be edited with maximum control.
Recommended tools:
- Lightroom — industry standard, desktop and mobile
- Snapseed — free, excellent mobile editor
- VSCO — great for consistent aesthetic and film-style presets
- Photomator — excellent iOS option with AI adjustments
Editing order that works:
- Exposure — overall brightness first
- Highlights — recover blown-out areas
- Shadows — bring back dark detail
- Contrast and clarity — definition and punch
- White balance — temperature and tint for the mood
- Color grading — subtle specific color adjustments
- Sharpening — always last, never first
The most consistent editing mistake — over-saturating colors until they look artificial. Subtle edits that enhance what was already there almost always look better than dramatic edits that replace the original mood entirely. Edit with purpose and know when to stop.
Safety, Backup, and Storage
Losing photos on a trip is devastating and almost entirely preventable.
- Multiple SD cards — never put an entire trip on one card
- Waterproof camera bag — non-optional near water or in tropical climates
- Back up daily to cloud storage and a portable drive — both, not one
- Don’t display expensive gear unnecessarily in areas with higher theft risk
Our Travel Safety Tips guide covers gear security in the context of broader travel safety. For official international safety guidelines that affect where and how you can photograph, the U.S. Department of State Travel Advisory provides current destination-specific information.
Advanced Travel Photography Tips
Arrive early at popular locations — 20-30 minutes before sunrise at any famous viewpoint means you have it to yourself with the best light. Every single time. This one habit alone transforms travel photography more than any gear upgrade.
Ask locals for hidden spots — accommodation staff, local guides, and people you meet know locations that don’t appear on any photography blog. These are consistently where the best photos come from.
Return to the same location multiple times — different times of day, different weather, different light. A location at golden hour looks completely different from the same spot at blue hour or midday. The photographers who get the best shots are almost always the ones who went back.
Shoot candid over posed — candid moments capture genuine emotion and authentic story. The laughing market vendor, the child watching something with complete focus. These are the photos people respond to most consistently.
Be patient — the shot you want often requires waiting. For the crowd to thin, for the light to shift, for the moment to happen. Patience is a photography skill as much as composition or exposure.
Capture context as well as subjects — wide establishing shots, medium activity shots, close-up detail shots. Variety across all three creates a complete story rather than a collection of similar frames.
Why Timing Matters — A Real Photographer’s Account
Across travel photography communities, one pattern comes up more consistently than any other — the photographers who get the best shots arrived early. A travel photographer documenting Cappadocia described arriving at the main viewpoint 25 minutes before sunrise to find it completely empty. Over the next 40 minutes, the sky shifted from deep blue to pink to gold while hot air balloons rose from different directions. The first 15 minutes — before other visitors arrived — produced the strongest images of the entire trip.
Not because of equipment. Because of timing, preparation, and patience. Good travel photos are made deliberately.
Solo Travel Photography Tips
Traveling alone for photography has specific advantages — no compromising on timing or location, complete flexibility to stay for the perfect shot. The challenge is getting yourself in the frame.
A lightweight tripod and remote shutter or phone timer solve most of this — genuinely game changing once you try it. Asking fellow travelers or locals to take a specific shot works surprisingly well too — show them the framing you want on the screen, most people are happy to help. For comprehensive solo travel preparation that goes beyond photography, our Solo Travel Tips 2026 Guide covers everything about traveling alone effectively.
Travel Photography Tips by Destination Type
Cities and Urban Photography Blue hour is the best time for city photography — artificial lights glow, the sky still has colour and depth, and everything has an atmospheric quality that midday shots never achieve. Leading lines from streets, symmetry in architecture, reflections in wet surfaces after rain that most people walk straight past. A compact 35mm or 50mm equivalent lens works brilliantly for street photography — small enough to not draw attention, wide enough to capture context.
Landscape Photography Golden hour without compromise. Strong foreground interest that pulls the viewer into the scene. Tripod for sharp images at slower shutter speeds in low light. Patience for the right conditions — the light breaking through in the right direction, the cloud formations that make a landscape extraordinary rather than just adequate. For landscape photography in genuinely extraordinary natural environments, our Ecuador and Galapagos Local Travel Tips covers one of the most photographically remarkable destinations on earth.
Portrait and People Photography Ask permission whenever possible — a smile and a gesture toward your camera is universally understood. It’s respectful, produces better photos because the subject is relaxed, and in many destinations it’s legally required. Overcast light for even skin tones. Eye-level shooting creates genuine connection in the image. For cultural photography etiquette in remote destinations, our Local Travel Tips Mongolia covers specific cultural considerations worth knowing before pointing a camera at anyone.
Night Photography Tripod is non-negotiable. ISO as low as the conditions allow. Longer shutter speeds for light trails and atmospheric glow. Remote shutter or self-timer to eliminate camera shake from pressing the button.
Building a Travel Photography Portfolio
Shoot with a developing visual style — consistent editing, recognizable subject matter, a look that becomes yours over time. Platforms like Instagram, 500px, and Behance work well for building an audience. Stock photography sites including Shutterstock and Adobe Stock can generate real income from travel photos once you have a sufficient library.
Student photographers can also offer travel content creation services to small hostels and tour operators in exchange for accommodation or reduced trip costs — a legitimate way to fund travel while building a portfolio
The photographers who improve fastest aren’t the ones with the best gear. They’re the ones who shoot the most, review their work honestly, identify what’s working and what isn’t, and adjust. Volume of deliberate practice beats equipment every single time.
Frequently Asked Questions — Travel Photography Tips
Do I need an expensive camera to start travel photography?
No — skills matter significantly more than gear at every level. A modern smartphone used with genuine understanding of light and composition produces better results than an expensive camera used without thought. Start with what you have and upgrade only when you’ve genuinely outgrown it.
Should I shoot RAW or JPEG?
RAW whenever your camera supports it — dramatically better editing control, particularly for recovering highlights and shadows. Files are larger but storage is cheap and the quality difference is real.
What’s the best time for travel photography?
Golden hour consistently. Blue hour immediately after sunset is exceptional for cities. Overcast days are genuinely excellent for portraits and street photography and completely underrated by beginners.
How do I make my photos sharper?
Fast enough shutter speed for your subject. Stable support — tripod or braced against a wall. Accurate focus point on your actual subject.
Should I use presets?
Yes — presets save editing time and help develop consistent visual style. Treat them as a starting point and adjust for each photo’s specific light and mood. A preset applied without adjustment usually looks wrong.
How do I photograph people respectfully while traveling?
Ask first — a smile and camera gesture is universally understood. Learn “may I take your photo” in the local language. Offer to show subjects the result. Accept no gracefully and move on.
What’s the single most impactful travel photography tip?
Arrive early. Every time without exception. Early morning at any location means soft light, no crowds, and the peaceful atmosphere that produces genuinely memorable images. Every experienced travel photographer says this because it’s consistently and reliably true.
Awamar Chheena is the founder of Travel Tips for Students. He writes practical guides to help students find travel deals, student discounts, and budget-friendly tips. His goal is to make travel more affordable for students around the world.